FCM과 함께 푸시 알림을 설정하는 것은 아래 글에서 확인하실 수 있어요.
https://zzingonglog.tistory.com/40
플러터 앱에 Firebase Cloud Messaging(FCM) 푸시 알림 설정하기 - Android
플러터 프로젝트에 Firebase에서 제공하는 FCM을 설정해 보겠습니다. 공식문서: https://firebase.google.com/docs/cloud-messaging?hl=ko Firebase 클라우드 메시징 Firebase 클라우드 메시징(FCM)은 무료로 메시지를 안
zzingonglog.tistory.com
이어서 이번글에서는 안드로이드와 ios 두 플랫폼에서 푸시 알림 기능을 구현하기 flutter_local_notifications 패키지를 사용해 보도록 할게요.
프로젝트에서 필요한 기능은 앱이 백그라운드 상태이거나 포그라운드 상태 일 때 타이머의 세션이 완료되면 사용자에게 푸시 알람을 전송하는 것이 목표입니다.
공식문서 참조: https://pub.dev/packages/flutter_local_notifications
flutter_local_notifications | Flutter package
A cross platform plugin for displaying and scheduling local notifications for Flutter applications with the ability to customise for each platform.
pub.dev
1. 새 프로젝트 생성
1) 플러터 프로젝트 생성
프로젝트에는 이전 글에서 구현했었던 FCM을 걷어낼 예정이라 새로운 프로젝트에서 연습을 해보고 실제 프로젝트에 반영을 할거에요.
터미널에서 새 프로젝트를 하나 만들어줍니다.
flutter create test_noti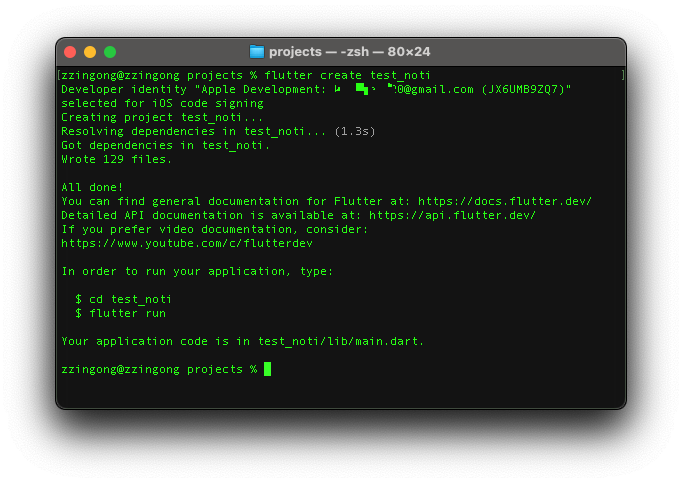
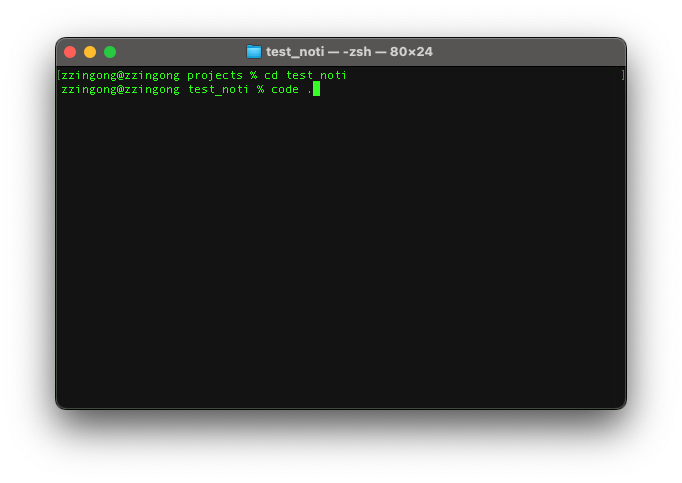
만들어진 디렉터리로 들어가서 바로 vscode로 열어서 작업을 진행해 봅시다.
2) 패키지 추가
flutter_local_notifications와 timezone 패키지를 추가해 줍니다.
설치하고자 하는 패키지 이름을 공백으로 구분하여 한번에 추가할 수 있어요.
flutter pub add flutter_local_notifications timezone
2. 안드로이드 설정
gradle 파일을 수정해주어야 하는데요.
혼동이 없도록 각 항목마다 전체 파일을 같이 첨부했어요.
1) android/build.gradle
//추가
buildscript {
    ext.kotlin_version = '1.7.20'
    repositories {
        google()
        mavenCentral()
    }

    dependencies {
        classpath 'com.android.tools.build:gradle:7.3.1'
    }
}

allprojects {
    repositories {
        google()
        mavenCentral()
    }
}

rootProject.buildDir = '../build'
subprojects {
    project.buildDir = "${rootProject.buildDir}/${project.name}"
}
subprojects {
    project.evaluationDependsOn(':app')
}

tasks.register("clean", Delete) {
    delete rootProject.buildDir
}
2) android/app/build.gradle
API는 최소 34를 사용해야 한다고 하니 컴파일 SDK는 34로 수정해 줍니다.
테스트할 안드로이드 시뮬레이터도 34 이상으로 설치해 주세요.
android {
    namespace "com.example.test_noti"
    compileSdkVersion 34 //34로 수정
    ...
}
또한 플러그인의 안드로이드 하위 호환을 위해 desugaring(플러그인 비활성화) 옵션을 true로 해줍니다.
desugaring은 이전 낮은 버전의 기기(API 23 이하)에서 Java 8 API를 사용할 수 없는 것을 사용할 수 있도록 하기 위한 방법이라고 합니다.
android {
	...
    compileOptions {
        coreLibraryDesugaringEnabled true //플러그인 비활성화
        sourceCompatibility JavaVersion.VERSION_1_8
        targetCompatibility JavaVersion.VERSION_1_8
    }
    ...
}
종속성에 코틀린 버전도 동일하게 설정해 줍니다. 플러그인 비활성화를 true로 할 경우 안드로이드 12L 이상에서 충돌이 일어날 수도 있다고 하니 아래와 같이 WindowManager 라이브러리를 종속성으로 추가해야 합니다. desugaring 할 라이브러리도 추가해 줍니다.
dependencies {
    implementation "org.jetbrains.kotlin:kotlin-stdlib-jdk7:$kotlin_version"
    implementation 'androidx.window:window:1.0.0'
    implementation 'androidx.window:window-java:1.0.0'
    coreLibraryDesugaring 'com.android.tools:desugar_jdk_libs:1.2.2'
}
아래는 전체 파일입니다.
plugins {
    id "com.android.application"
    id "kotlin-android"
    id "dev.flutter.flutter-gradle-plugin"
}

def localProperties = new Properties()
def localPropertiesFile = rootProject.file('local.properties')
if (localPropertiesFile.exists()) {
    localPropertiesFile.withReader('UTF-8') { reader ->
        localProperties.load(reader)
    }
}

def flutterVersionCode = localProperties.getProperty('flutter.versionCode')
if (flutterVersionCode == null) {
    flutterVersionCode = '1'
}

def flutterVersionName = localProperties.getProperty('flutter.versionName')
if (flutterVersionName == null) {
    flutterVersionName = '1.0'
}

android {
    namespace "com.example.test_noti"
    compileSdkVersion 34 //34로 수정
    ndkVersion flutter.ndkVersion

    compileOptions {
        coreLibraryDesugaringEnabled true //추가
        sourceCompatibility JavaVersion.VERSION_1_8
        targetCompatibility JavaVersion.VERSION_1_8
    }

    kotlinOptions {
        jvmTarget = '1.8'
    }

    sourceSets {
        main.java.srcDirs += 'src/main/kotlin'
    }

    defaultConfig {
        multiDexEnabled true //api 레벨이 21보다 낮을 경우 true로 설정(하위호환)
        applicationId "com.example.test_noti"
        minSdkVersion 21 //최소 버전은 21로 수정
        targetSdkVersion 34 //34로 수정
        versionCode flutterVersionCode.toInteger()
        versionName flutterVersionName
    }

    buildTypes {
        release {
            // TODO: Add your own signing config for the release build.
            // Signing with the debug keys for now, so `flutter run --release` works.
            signingConfig signingConfigs.debug
        }
    }
}

flutter {
    source '../..'
}

//추가
dependencies {
    implementation "org.jetbrains.kotlin:kotlin-stdlib-jdk7:$kotlin_version"
    implementation 'androidx.window:window:1.0.0'
    implementation 'androidx.window:window-java:1.0.0'
    coreLibraryDesugaring 'com.android.tools:desugar_jdk_libs:1.2.2' //desugaring할 라이브러리를 추가
}
3) android/app/src/main/AndroidManifest.xml
앱 매니페스트에 필요한 권한을 선언합니다.
아래 링크에서 권한 목록을 확인하실 수 있어요.
https://developer.android.com/reference/android/Manifest.permission
Manifest.permission | Android Developers
developer.android.com
USE_EXACT_ALARM 속성의 경우에는 캘린더나 알람 시계 앱과 같은 앱은 반드시 선언해야 한다고 하네요.
정확한 알람 예약은 기본적으로 거부됨 | Android Developers
The Android 15 Developer Preview is now available. Try it out today and let us know what you think! 이 페이지는 Cloud Translation API를 통해 번역되었습니다. 정확한 알람 예약은 기본적으로 거부됨 컬렉션을 사용해 정리
developer.android.com
저는 공식문서의 샘플 코드와 동일하게 넣어보았습니다.
<uses-permission android:name="android.permission.RECEIVE_BOOT_COMPLETED"/>
<uses-permission android:name="android.permission.VIBRATE" />
<uses-permission android:name="android.permission.USE_FULL_SCREEN_INTENT" />
<uses-permission android:name="android.permission.USE_EXACT_ALARM" />
<uses-permission android:name="android.permission.POST_NOTIFICATIONS"/>
<uses-permission android:name="android.permission.FOREGROUND_SERVICE" />
전체 화면 인텐드 알림을 예약하는 기능이 필요한 경우에 다음 속성을 추가합니다.
디바이스가 잠겨 있을 때 화면이 켜지고 표시됩니다.
android:showWhenLocked="true"
android:turnScreenOn="true
예약된 푸시 알림을 표시하려면 다음과 같이 지정합니다.
<receiver android:exported="false" android:name="com.dexterous.flutterlocalnotifications.ScheduledNotificationReceiver" />
<receiver android:exported="false" android:name="com.dexterous.flutterlocalnotifications.ScheduledNotificationBootReceiver">
	<intent-filter>
		<action android:name="android.intent.action.BOOT_COMPLETED"/>
		<action android:name="android.intent.action.MY_PACKAGE_REPLACED"/>
		<action android:name="android.intent.action.QUICKBOOT_POWERON" />
		<action android:name="com.htc.intent.action.QUICKBOOT_POWERON"/>
	</intent-filter>
</receiver>
전체 파일은 아래와 같습니다.
<manifest xmlns:android="http://schemas.android.com/apk/res/android">
    <!--추가 -->
    <uses-permission android:name="android.permission.RECEIVE_BOOT_COMPLETED"/>
    <uses-permission android:name="android.permission.VIBRATE" />
    <uses-permission android:name="android.permission.USE_FULL_SCREEN_INTENT" />
    <uses-permission android:name="android.permission.USE_EXACT_ALARM" />
    <uses-permission android:name="android.permission.POST_NOTIFICATIONS"/>
    <uses-permission android:name="android.permission.FOREGROUND_SERVICE" />
    <!--end -->
    <application
        android:label="test_noti"
        android:name="${applicationName}"
        android:icon="@mipmap/ic_launcher">
        <activity
            android:name=".MainActivity"
            android:exported="true"
            android:launchMode="singleTop"
            android:theme="@style/LaunchTheme"
            android:configChanges="orientation|keyboardHidden|keyboard|screenSize|smallestScreenSize|locale|layoutDirection|fontScale|screenLayout|density|uiMode"
            android:hardwareAccelerated="true"
            android:windowSoftInputMode="adjustResize"
            <!-- activity 태그 안에 속성 추가 -->
           android:showWhenLocked="true"
            android:turnScreenOn="true">
            <!-- end -->
            <meta-data
              android:name="io.flutter.embedding.android.NormalTheme"
              android:resource="@style/NormalTheme"
              />
            <intent-filter>
                <action android:name="android.intent.action.MAIN"/>
                <category android:name="android.intent.category.LAUNCHER"/>
            </intent-filter>
        </activity>
        <meta-data
            android:name="flutterEmbedding"
            android:value="2" />
        <!-- 추가 -->
        <receiver android:exported="false" android:name="com.dexterous.flutterlocalnotifications.ScheduledNotificationReceiver" />
        <receiver android:exported="false" android:name="com.dexterous.flutterlocalnotifications.ScheduledNotificationBootReceiver">
            <intent-filter>
                <action android:name="android.intent.action.BOOT_COMPLETED"/>
                <action android:name="android.intent.action.MY_PACKAGE_REPLACED"/>
                <action android:name="android.intent.action.QUICKBOOT_POWERON" />
                <action android:name="com.htc.intent.action.QUICKBOOT_POWERON"/>
            </intent-filter>
        </receiver>
        <!--end -->
    </application>
    <queries>
        <intent>
            <action android:name="android.intent.action.PROCESS_TEXT"/>
            <data android:mimeType="text/plain"/>
        </intent>
    </queries>
</manifest>
3. ios 설정
1) ios/Runner/AppDelegate.swift
아래 코드를 파일에 붙여 넣기 합니다.
if #available(iOS 10.0, *) {
	UNUserNotificationCenter.current().delegate = self as UNUserNotificationCenterDelegate
}
전체 코드입니다.
import UIKit
import Flutter
import flutter_local_notifications //추가

@UIApplicationMain
@objc class AppDelegate: FlutterAppDelegate {

  override func application(
    _ application: UIApplication,
    didFinishLaunchingWithOptions launchOptions: [UIApplication.LaunchOptionsKey: Any]?
  ) -> Bool {
    //추가
    if #available(iOS 10.0, *) {
      UNUserNotificationCenter.current().delegate = self as UNUserNotificationCenterDelegate
    }

    GeneratedPluginRegistrant.register(with: self)
    return super.application(application, didFinishLaunchingWithOptions: launchOptions)
  }
}
4. 코드 작성
1) main.dart
처음엔 로컬 푸시 알림 플러그인을 초기화해 줍니다.
앱이 종료된 후 푸시 알림을 탭할 때 응답을 처리하기 위해 getNotificationAppLaunchDetails 함수를 사용합니다.
푸시 알림을 탭 하면서 앱의 첫 시작점인 경우 /message 경로로 payload를 전달합니다.
이 때문에 상단에 main 함수 외부에 플러그인 객체를 하나 만들어주었습니다.
root 시작점인 MyApp위젯의 MaterialApp에서는 HomePage인 / 경로와, paylaod 데이터를 보여줄 MessagePage인 /message로 경로를 구성했어요.
import 'package:flutter/material.dart';
import 'package:flutter_local_notifications/flutter_local_notifications.dart';
import 'package:test_noti/message_page.dart';
import 'package:test_noti/home_page.dart';
import 'package:test_noti/local_push_notifications.dart';

final navigatorKey = GlobalKey<NavigatorState>();
FlutterLocalNotificationsPlugin flutterLocalNotificationsPlugin =
    FlutterLocalNotificationsPlugin();
void main() async {
  WidgetsFlutterBinding.ensureInitialized();
  //로컬 푸시 알림 초기화
  await LocalPushNotifications.init();

  //앱이 종료된 상태에서 푸시 알림을 탭할 때
  final NotificationAppLaunchDetails? notificationAppLaunchDetails =
    await flutterLocalNotificationsPlugin.getNotificationAppLaunchDetails();
  if (notificationAppLaunchDetails?.didNotificationLaunchApp ?? false) {
    Future.delayed(const Duration(seconds: 1), () {
      navigatorKey.currentState!.pushNamed('/message',
          arguments: notificationAppLaunchDetails?.notificationResponse?.payload);
    });
  }
  runApp(const MyApp());
}

class MyApp extends StatelessWidget {
  const MyApp({super.key});

  @override
  Widget build(BuildContext context) {
    return MaterialApp(
      navigatorKey: navigatorKey,
      title: 'Flutter Demo',
      theme: ThemeData(
        colorScheme: ColorScheme.fromSeed(seedColor: Colors.deepPurple),
        useMaterial3: true,
      ),
      routes: {
        '/': (context) => const HomePage(),
        '/message': (context) => const MessagePage(),
      },
    );
  }
}
2) local_push_notification.dart
가장 중요한 로컬 푸시 알림 구현 코드 부분입니다.
주요 기능 3가지를 구현했어요.
기본적인 일반 푸시 알림과 주기적으로 푸시 알림 기능, 그리고 특정 시간에 스케줄 화하여 보내는 예정된 푸시 알림 기능입니다.
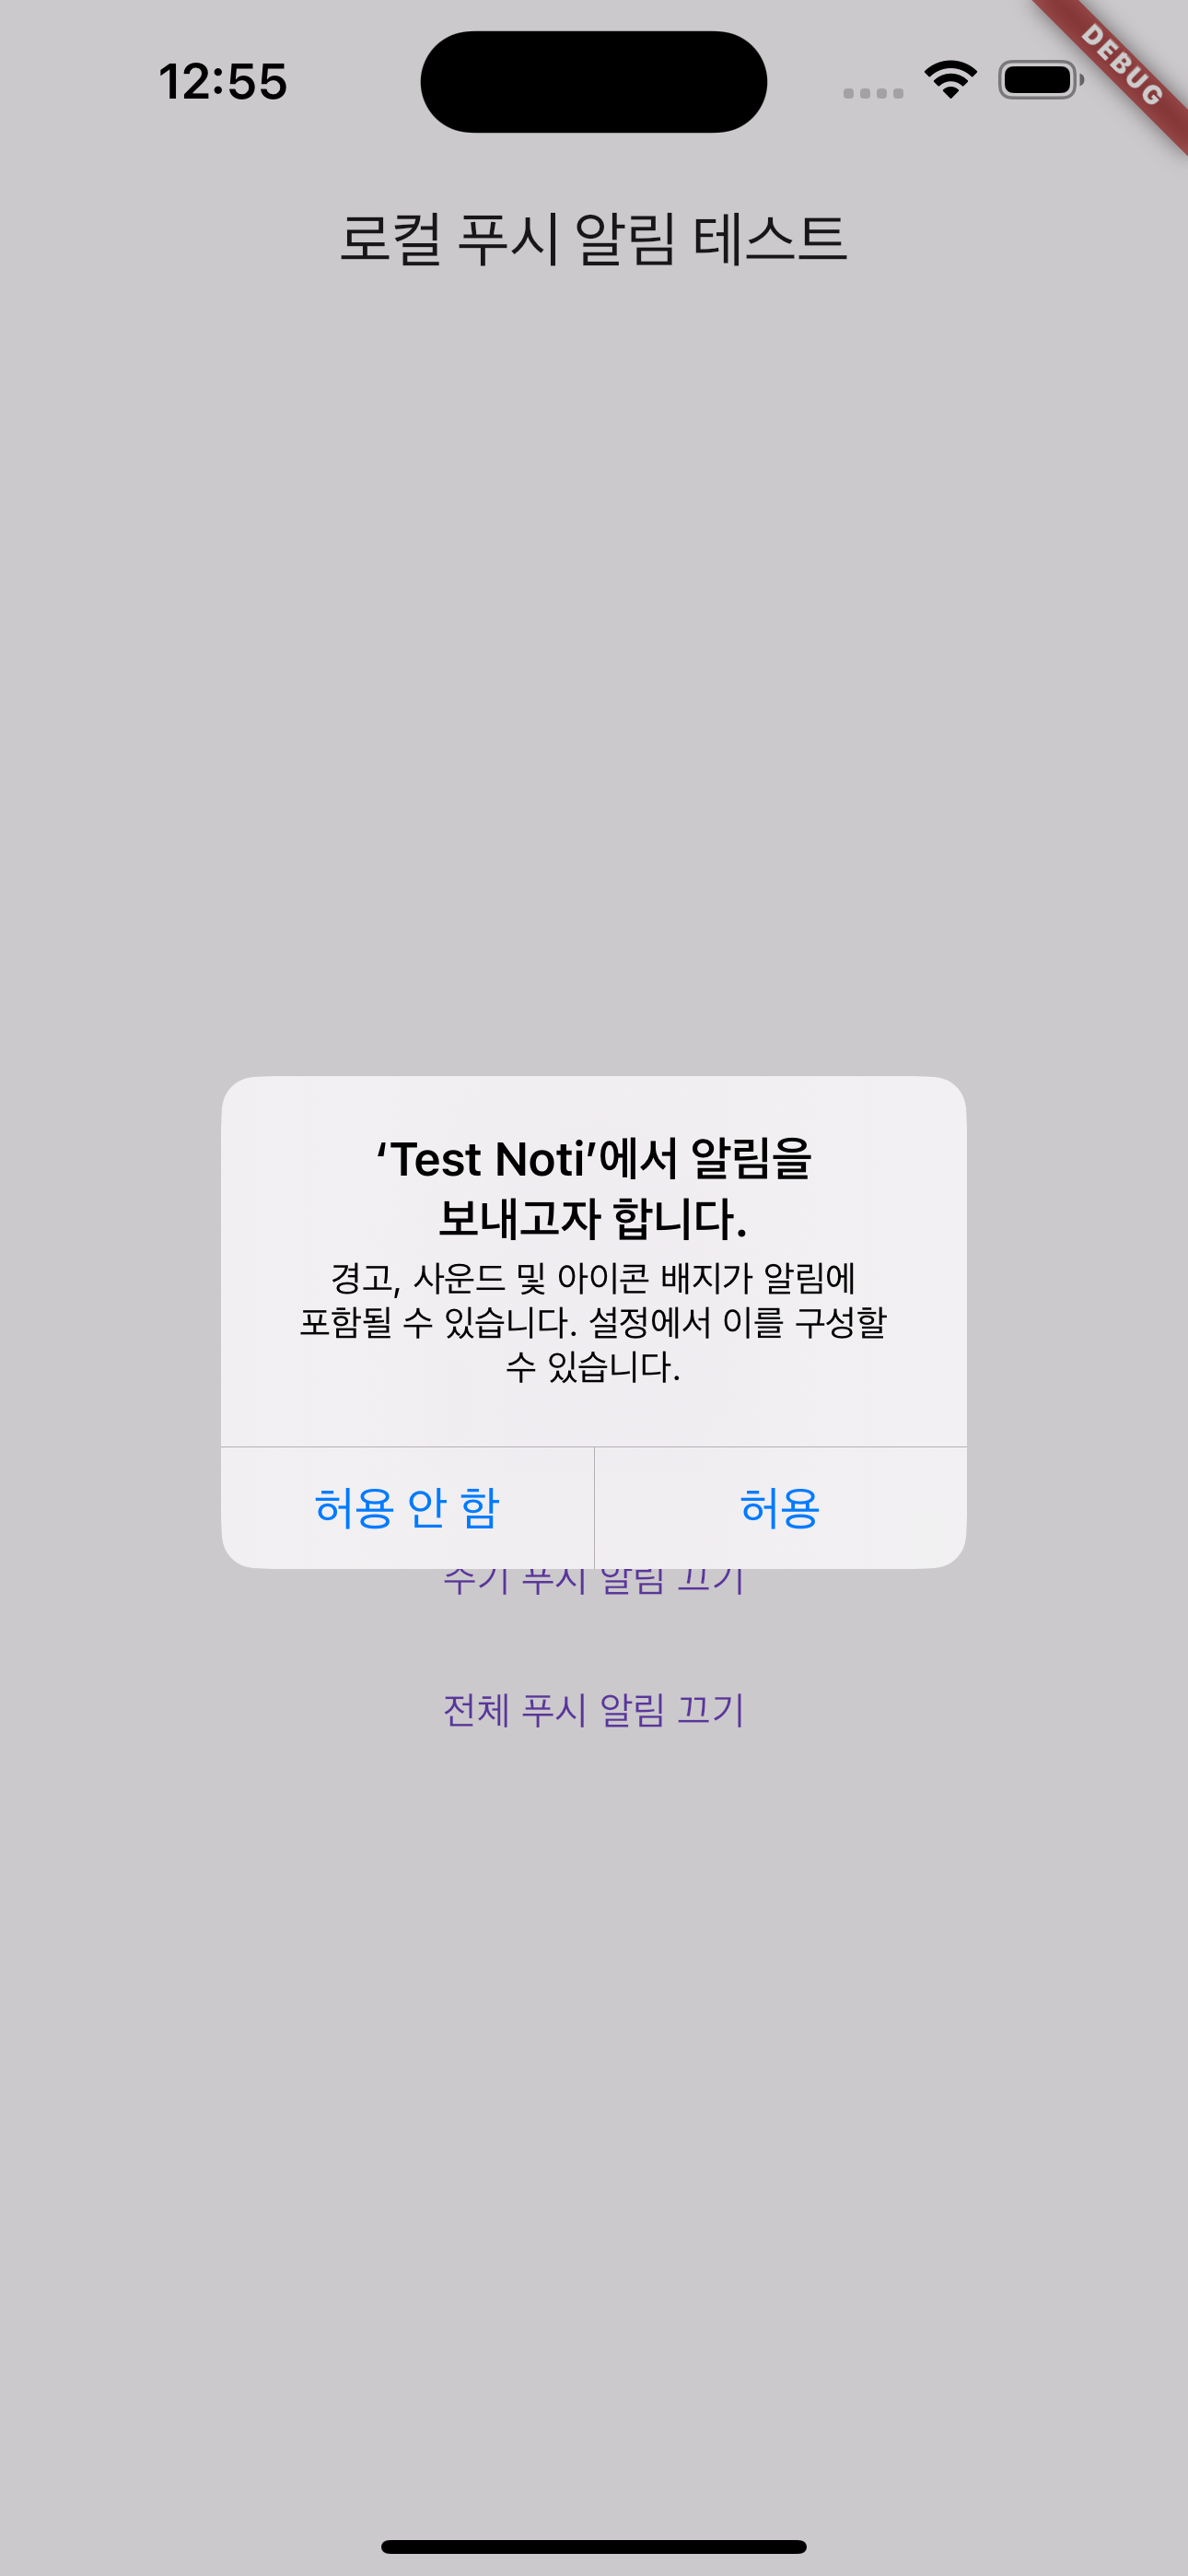
주의해야 할 사항은 안드로이드는 푸시 알림 권한을 반드시 요청해주어야 해요. 그리고 사용자가 승인을 해주어야 푸시 알림을 받을 수 있습니다. ios는 따로 요청할 필요 없이 디폴트로 푸시 알림 권한을 요청해 주기 때문에 코드에서 따로 설정해 줄 필요는 없습니다!
그리고 푸시 알림을 show 함수를 이용해 보낼 때 푸시 알림의 id 값은 전부 다르게 설정해주어야 해요. 그래야 예약된 알림을 취소할 때 이 값을 이용하게 됩니다.
주기 푸시 알림은 주기를 설정하는 부분만 주의해서 잘 설정하시면 될 것 같고요.
스케줄 된 푸시 알림을 전송할 때는 timezone 패키지를 이용하여 현재 로컬 시간을 알아올 수 있고요. 이 현재 시간으로부터 Duration을 add 하여 원하는 시간에 예약된 푸시 알림을 보낼 수 있어요.
import 'dart:async';
import 'dart:io';
import 'package:timezone/data/latest_all.dart' as tz;
import 'package:timezone/timezone.dart' as tz;
import 'package:flutter_local_notifications/flutter_local_notifications.dart';

class LocalPushNotifications {
  //플러그인 인스턴스 생성
  static final FlutterLocalNotificationsPlugin
      _flutterLocalNotificationsPlugin = FlutterLocalNotificationsPlugin();

  //푸시 알림 스트림 생성
  static final StreamController<String?> notificationStream =
      StreamController<String?>.broadcast();

  //푸시 알림을 탭했을 때 호출되는 콜백 함수
  static void onNotificationTap(NotificationResponse notificationResponse) {
    notificationStream.add(notificationResponse.payload!);
  }

  //플러그인 초기화
  static Future init() async {
    //Android
    const AndroidInitializationSettings initializationSettingsAndroid =
        AndroidInitializationSettings('@mipmap/ic_launcher');
    //ios
    const DarwinInitializationSettings initializationSettingsDarwin =
        DarwinInitializationSettings();
    //Linux
    const LinuxInitializationSettings initializationSettingsLinux =
        LinuxInitializationSettings(defaultActionName: 'Open notification');

    const InitializationSettings initializationSettings =
        InitializationSettings(
            android: initializationSettingsAndroid,
            iOS: initializationSettingsDarwin,
            linux: initializationSettingsLinux);

    //안드로이드 푸시 알림 권한 요청
    if (Platform.isAndroid) {
      _flutterLocalNotificationsPlugin
          .resolvePlatformSpecificImplementation<
              AndroidFlutterLocalNotificationsPlugin>()!
          .requestNotificationsPermission();
    }

    _flutterLocalNotificationsPlugin.initialize(
      initializationSettings,
      onDidReceiveNotificationResponse:
          onNotificationTap, //푸시 알림 탭 시 호출되는 콜백 함수 등록
      onDidReceiveBackgroundNotificationResponse:
          onNotificationTap,
    );
  }

  //일반 푸시 알림 보내기
  static Future showSimpleNotification({
    required String title,
    required String body,
    required String payload,
  }) async {
    const AndroidNotificationDetails androidNotificationDetails =
        AndroidNotificationDetails('channel 1', 'channel 1 name',
            channelDescription: 'channel 1 description',
            importance: Importance.max,
            priority: Priority.high,
            ticker: 'ticker');
    const NotificationDetails notificationDetails =
        NotificationDetails(android: androidNotificationDetails);
    await _flutterLocalNotificationsPlugin
        .show(0, title, body, notificationDetails, payload: payload);
  }

  //매분마다 주기적인 푸시 알림 보내기
  static Future showPeriodicNotifications({
    required String title,
    required String body,
    required String payload,
  }) async {
    const AndroidNotificationDetails androidNotificationDetails =
        AndroidNotificationDetails('channel 2', 'channel 2 name',
            channelDescription: 'channel 2 description',
            importance: Importance.max,
            priority: Priority.high,
            ticker: 'ticker');
    const NotificationDetails notificationDetails =
        NotificationDetails(android: androidNotificationDetails);

    await _flutterLocalNotificationsPlugin.periodicallyShow(
        1, title, body, RepeatInterval.everyMinute, notificationDetails,
        payload: payload); //반복 간격 지정. 매 분마다 반복
  }

  // 지정된 스케쥴에 맞춰 알람 보내기
  static Future showScheduleNotification({
    required String title,
    required String body,
    required String payload,
  }) async {
    tz.initializeTimeZones(); //time zone 초기화
    await _flutterLocalNotificationsPlugin.zonedSchedule(
        2,
        title,
        body,
        tz.TZDateTime.now(tz.local).add(const Duration(seconds: 5)), //5초 이후에 푸시 알림
        const NotificationDetails(
            android: AndroidNotificationDetails(
                'channel 3', 'your channel name',
                channelDescription: 'your channel description',
                importance: Importance.max,
                priority: Priority.high,
                ticker: 'ticker')),
        androidScheduleMode: AndroidScheduleMode.exactAllowWhileIdle,
        uiLocalNotificationDateInterpretation:
            UILocalNotificationDateInterpretation.absoluteTime,
        payload: payload);
  }

  //채널 id에 해당하는 푸시 알림 취소
  static Future cancel(int id) async {
    await _flutterLocalNotificationsPlugin.cancel(id);
  }

  //푸시 알림 전체 취소
  static Future cancelAll() async {
    await _flutterLocalNotificationsPlugin.cancelAll();
  }
}
3) home_page.dart
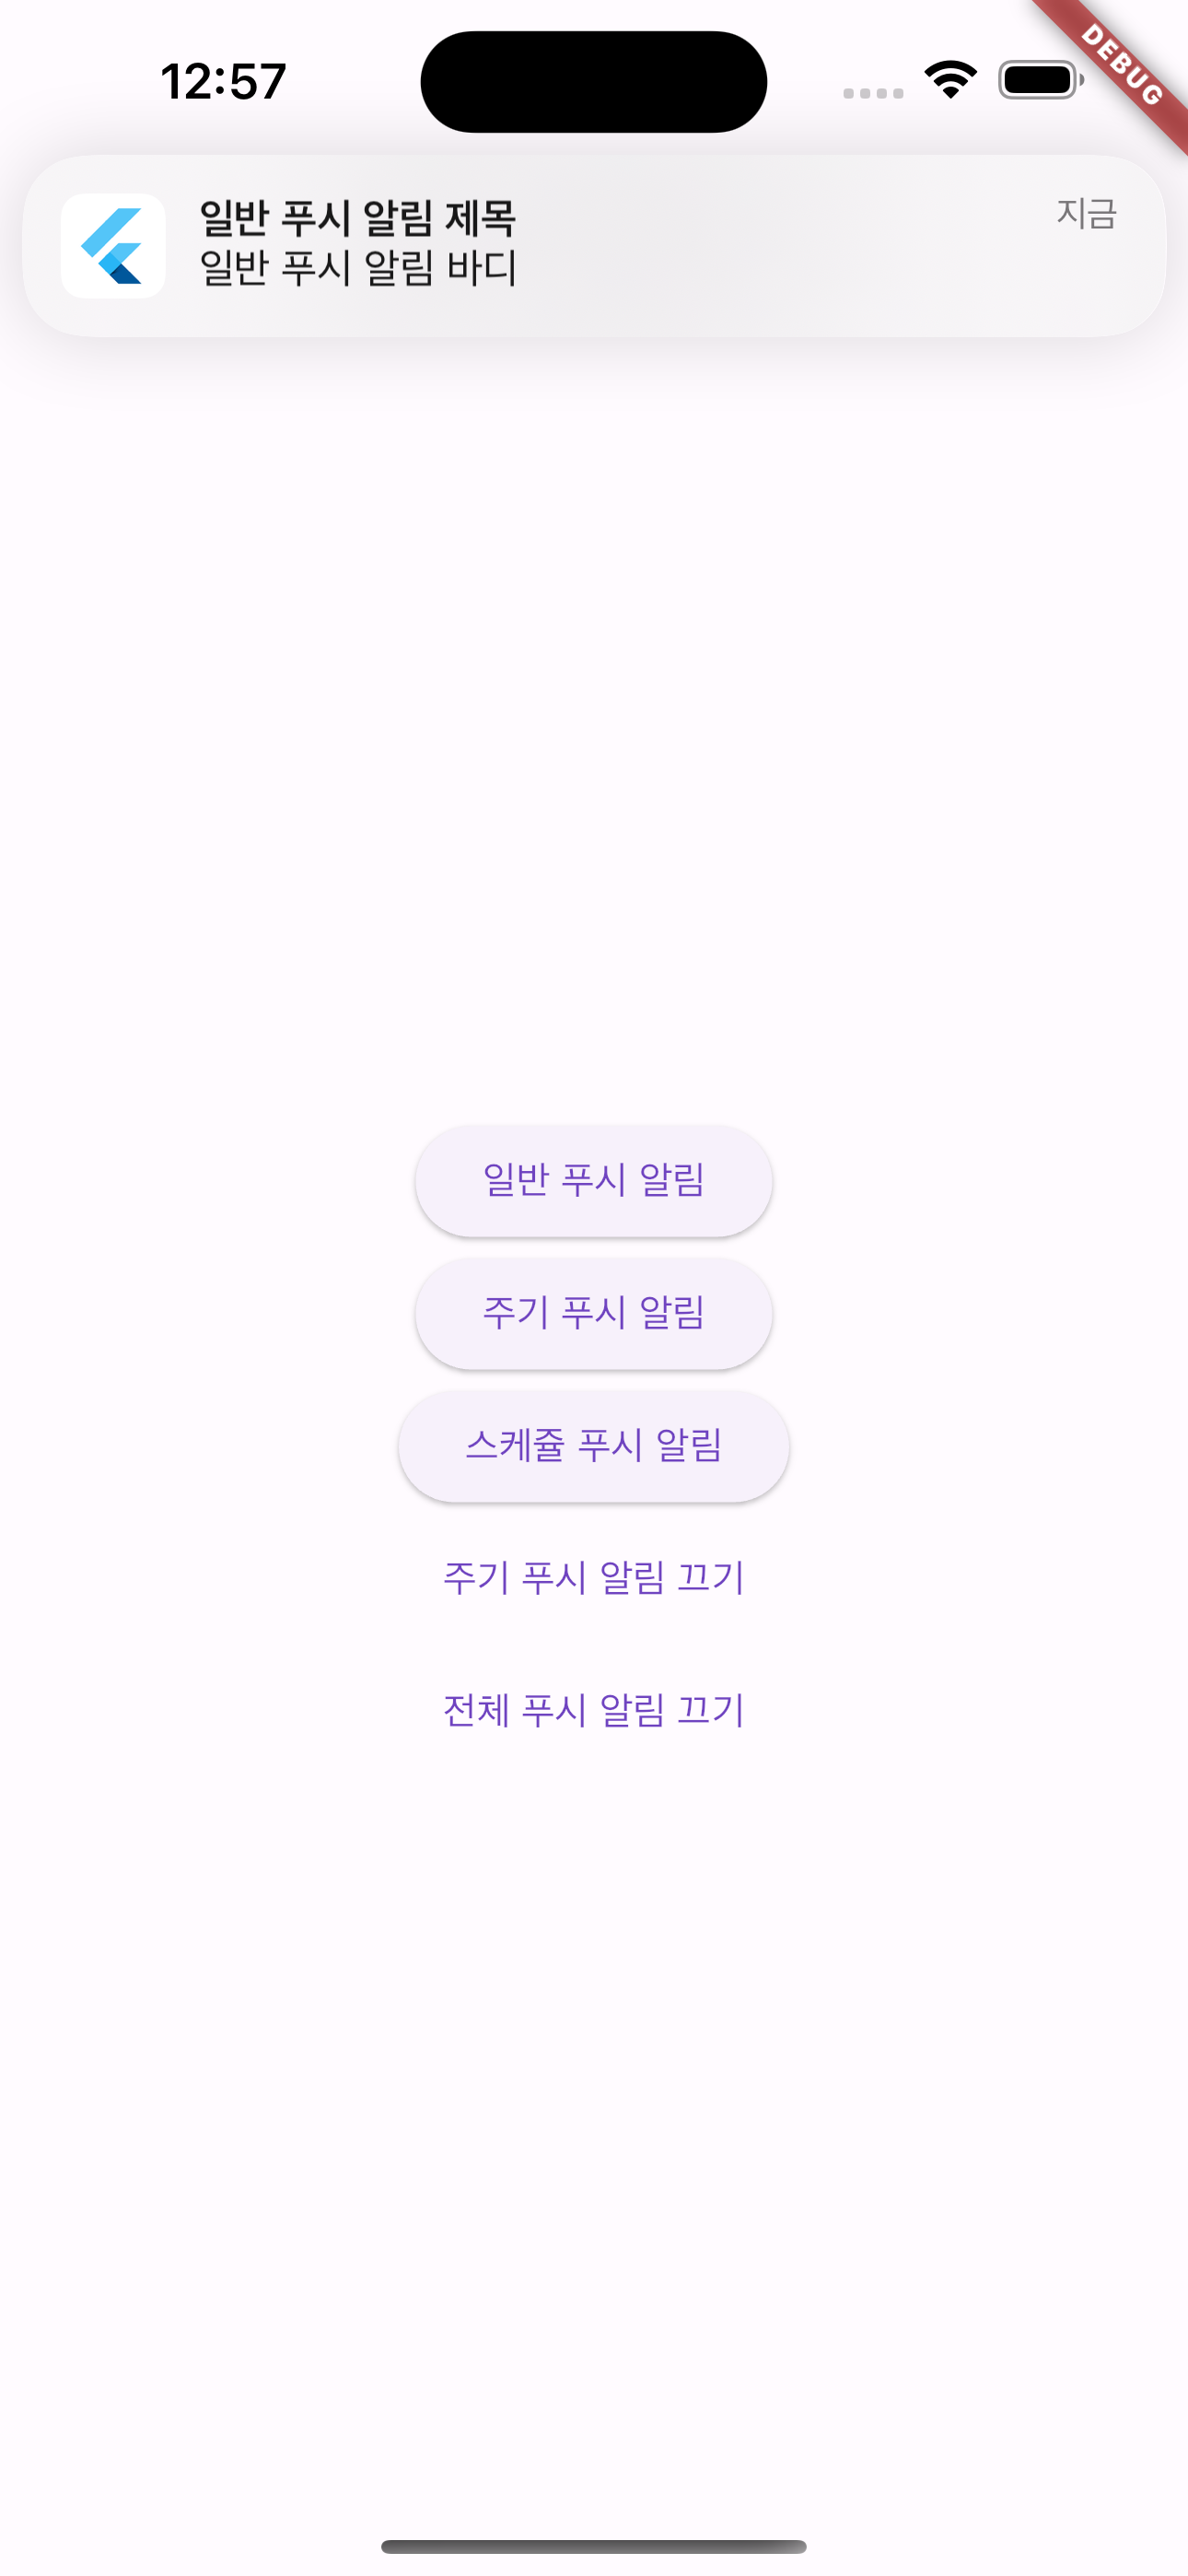
푸시 알림을 전송해 보는 테스트 화면입니다.
LocalPushNotifications 클래스에서 푸시 알림을 사용자가 탭 할 때마다 notificationStream 스트림에 payload를 전달하고 있는데요.
이 스트림을 통해 전달되는 payload 데이터를 이곳에서 리슨 하면서 payload에 값이 있으면 /message로 이동하게 됩니다.
import 'package:flutter/material.dart';
import 'package:test_noti/local_push_notifications.dart';

class HomePage extends StatefulWidget {
  const HomePage({super.key});

  @override
  State<HomePage> createState() => _HomePageState();
}

class _HomePageState extends State<HomePage> {
  @override
  void initState() {
    listenNotifications();
    super.initState();
  }
  //푸시 알림 스트림에 데이터를 리슨
  void listenNotifications() {
    LocalPushNotifications.notificationStream.stream.listen((String? payload) {
      if (payload != null) {
        print('Received payload: $payload');
        Navigator.pushNamed(context, '/message', arguments: payload);
      }
    });
  }
  @override
  void dispose() {
    super.dispose();
  }
  @override
  Widget build(BuildContext context) {
    return Scaffold(
      appBar: AppBar(
        title: const Text('로컬 푸시 알림 테스트'),
      ),
      body: Center(
        child: Column(
          mainAxisAlignment: MainAxisAlignment.center,
          children: [
            ElevatedButton(
              onPressed: () {
                LocalPushNotifications.showSimpleNotification(
                    title: "일반 푸시 알림 제목",
                    body: "일반 푸시 알림 바디",
                    payload: "일반 푸시 알림 데이터");
              },
              child: const Text('일반 푸시 알림'),
            ),
            ElevatedButton(
              onPressed: () {
                LocalPushNotifications.showPeriodicNotifications(
                    title: "주기적 푸시 알림 제목",
                    body: "주기적 푸시 알림 바디",
                    payload: "주기적 푸시 알림 데이터");
              },
              child: const Text('주기 푸시 알림'),
            ),
            ElevatedButton(
              onPressed: () {
                LocalPushNotifications.showScheduleNotification(
                    title: "스케쥴 푸시 알림 제목",
                    body: "스케쥴 푸시 알림 바디",
                    payload: "스케쥴 푸시 알림 데이터");
              },
              child: const Text("스케쥴 푸시 알림"),
            ),
            TextButton(
                onPressed: () {
                  LocalPushNotifications.cancel(1);
                },
                child: const Text('주기 푸시 알림 끄기')),
            TextButton(
                onPressed: () {
                  LocalPushNotifications.cancelAll();
                },
                child: const Text('전체 푸시 알림 끄기')),
          ],
        ),
      ),
    );
  }
}
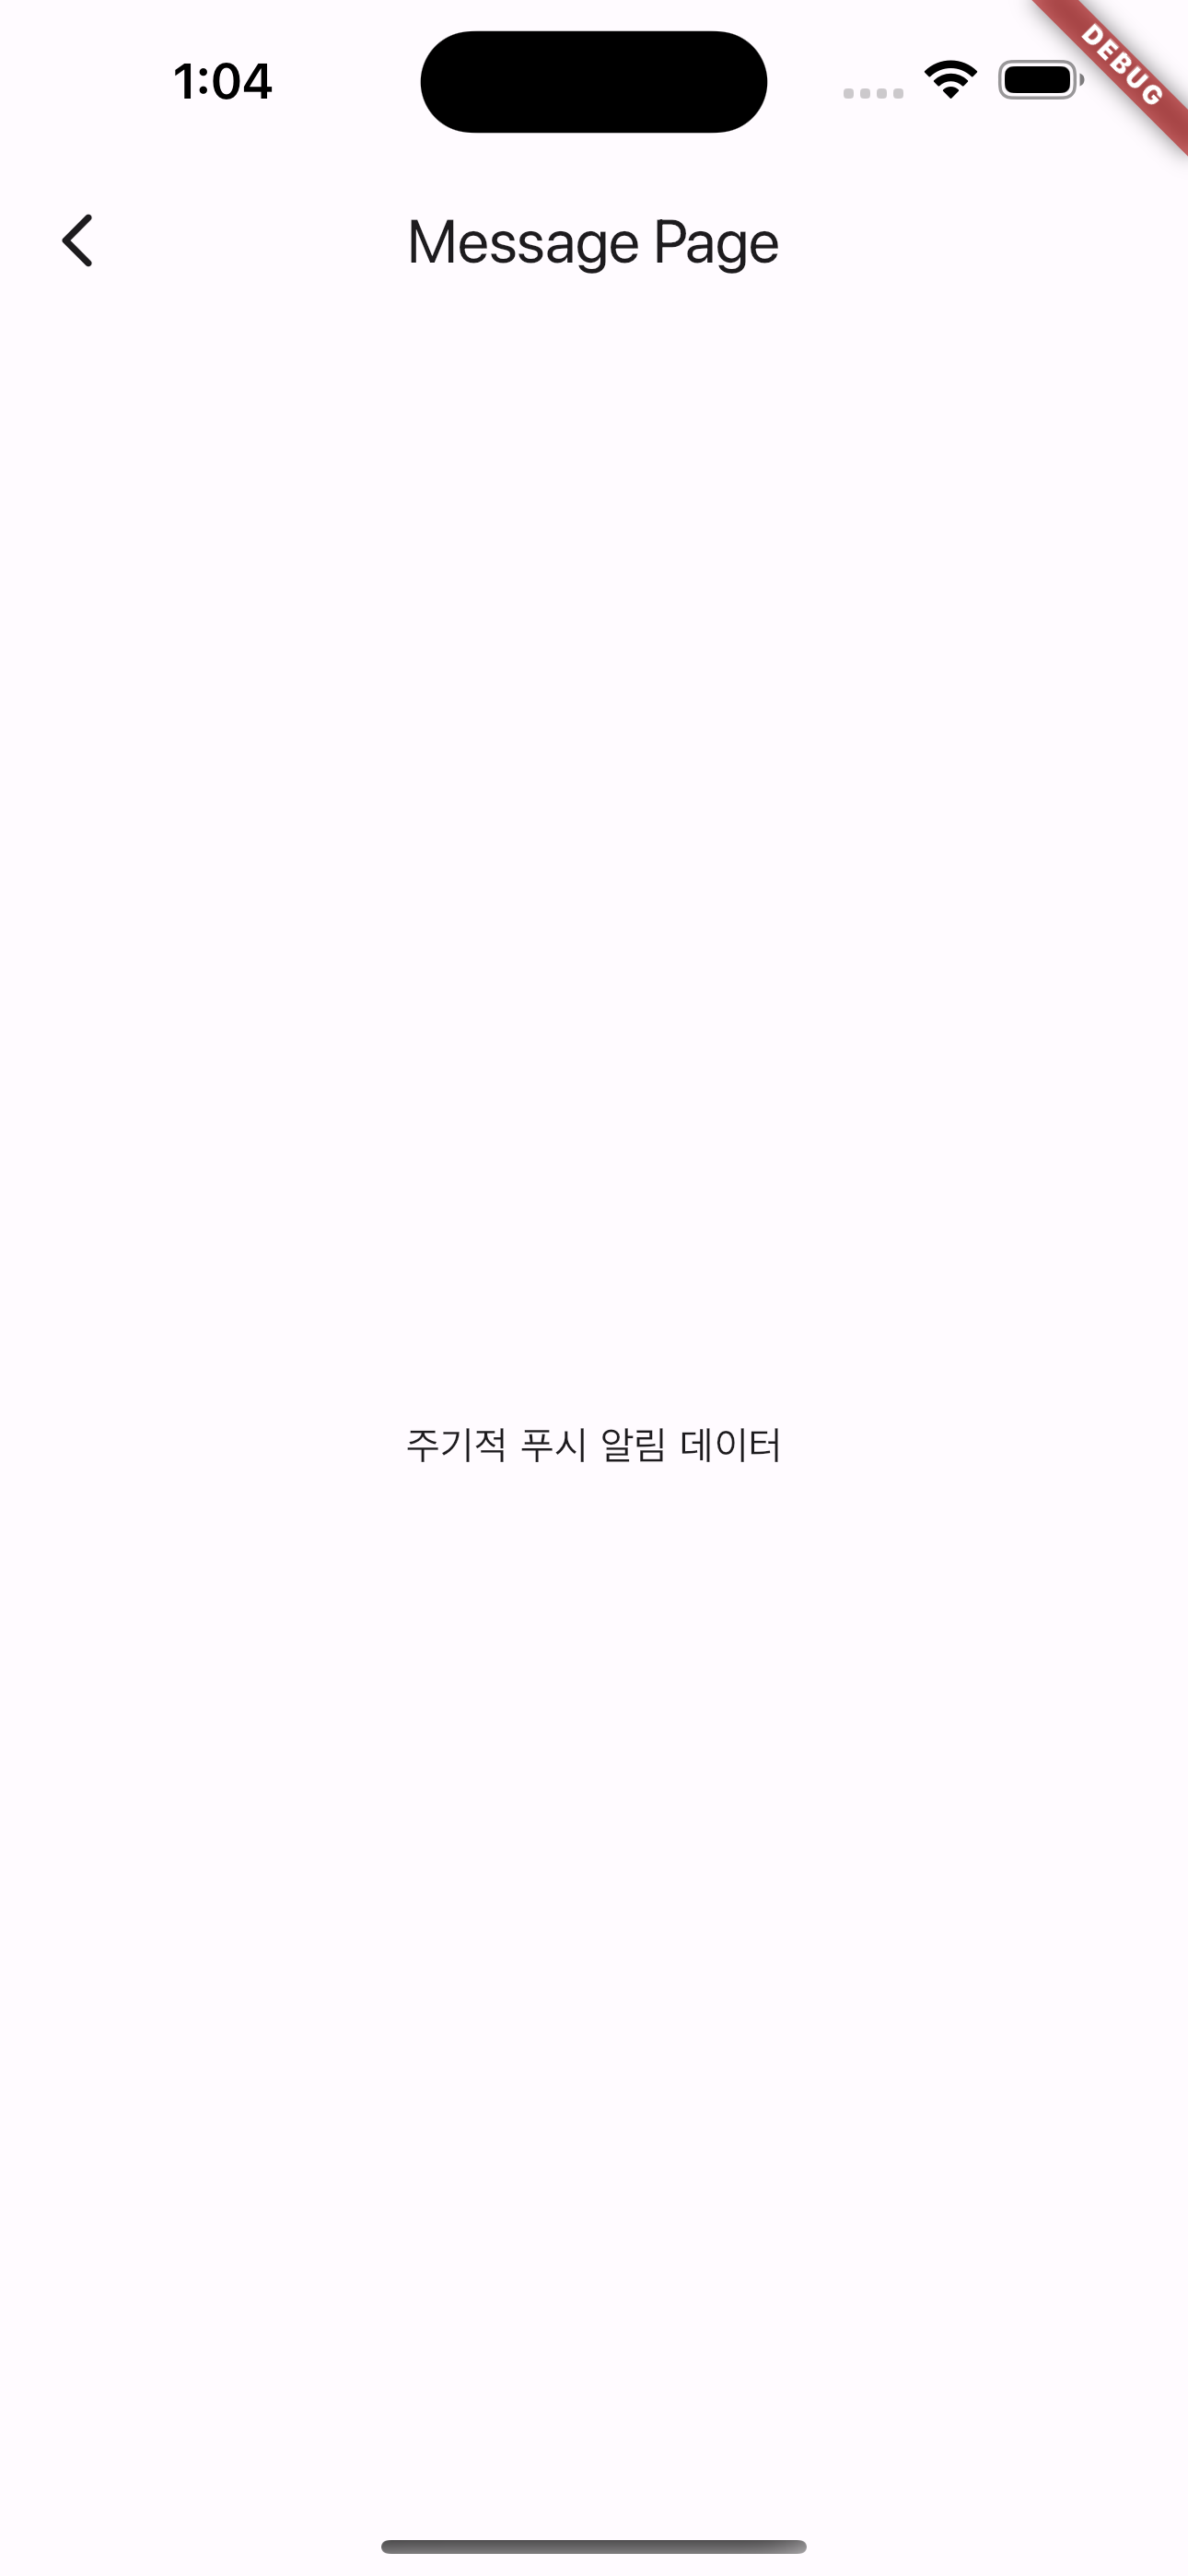
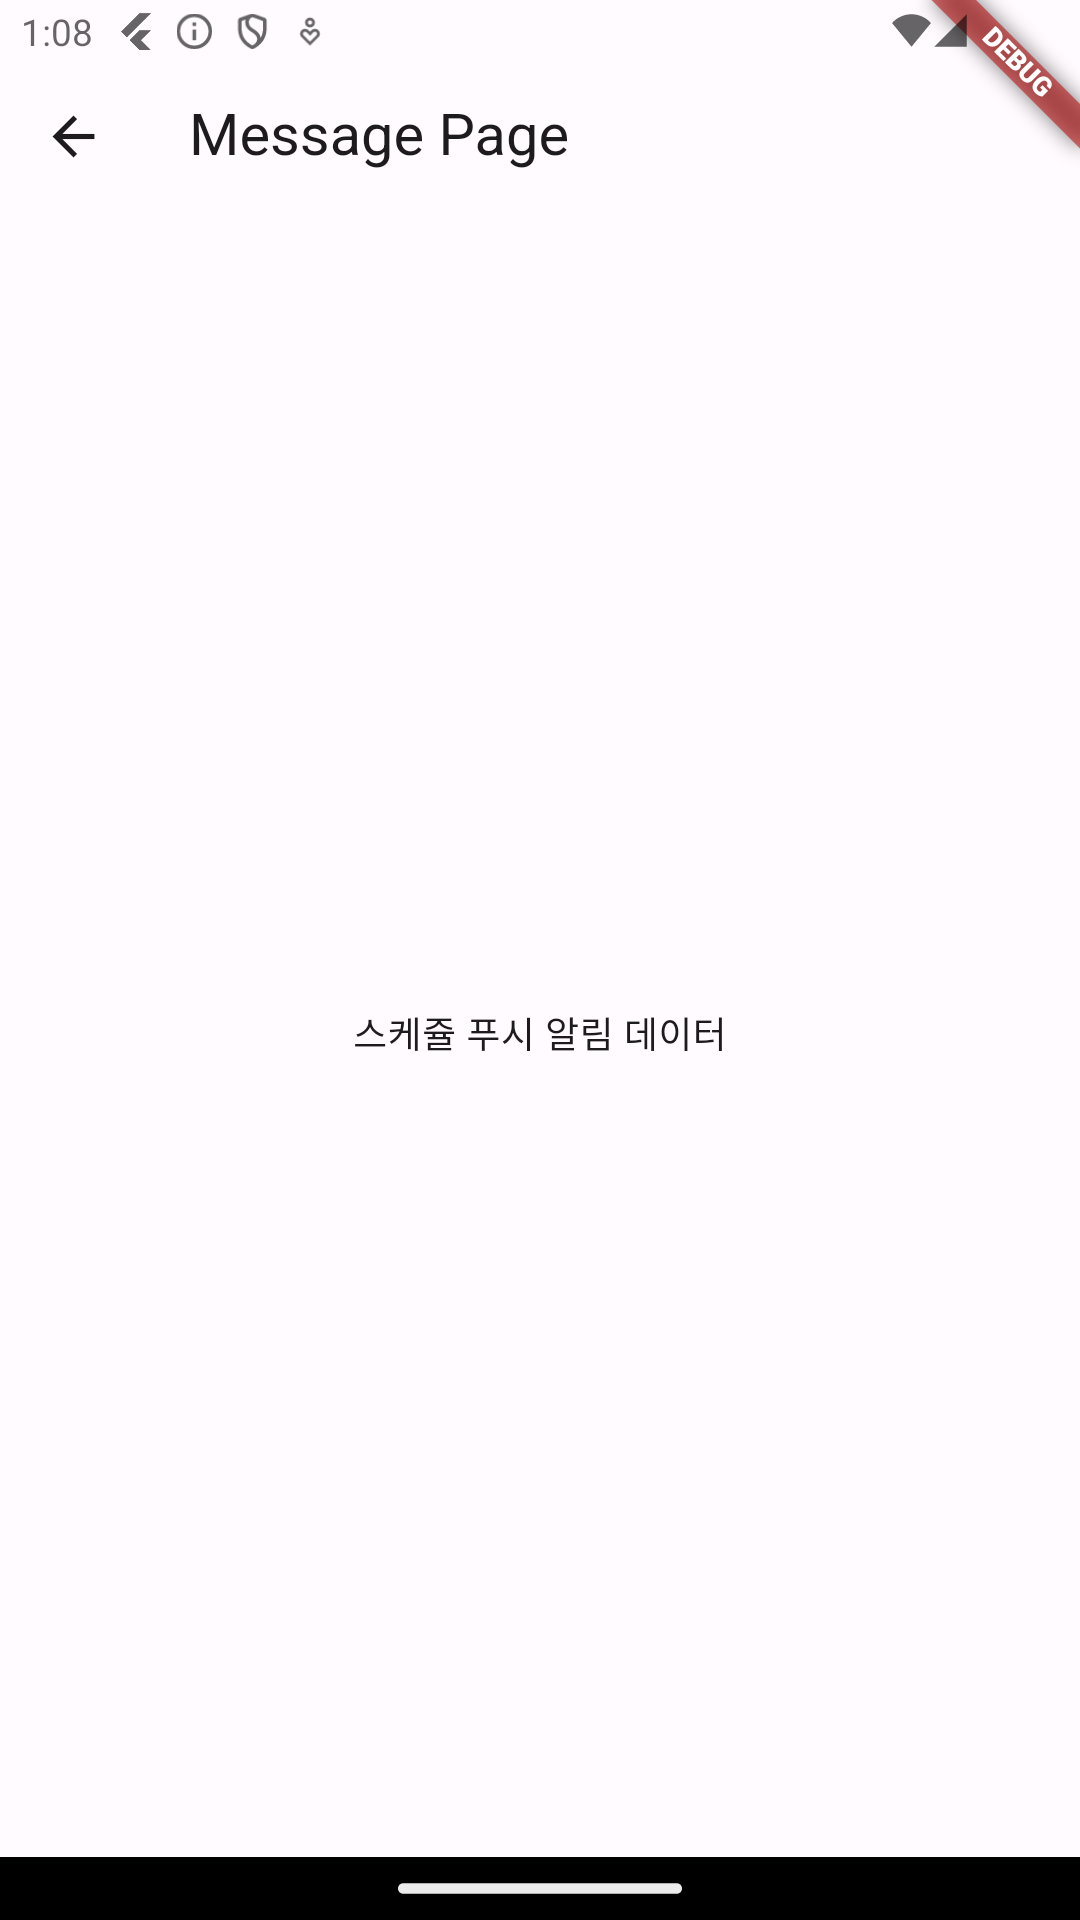
4) message_page.dart
전달받은 payload 데이터를 보여주는 화면입니다.
import 'package:flutter/material.dart';

class MessagePage extends StatelessWidget {
  const MessagePage({super.key});

  @override
  Widget build(BuildContext context) {
    final data = ModalRoute.of(context)!.settings.arguments;

    return Scaffold(
      appBar: AppBar(title: Text("Message Page")),
      body: Center(child: Text(data.toString())),
    );
  }
}
5. 테스트
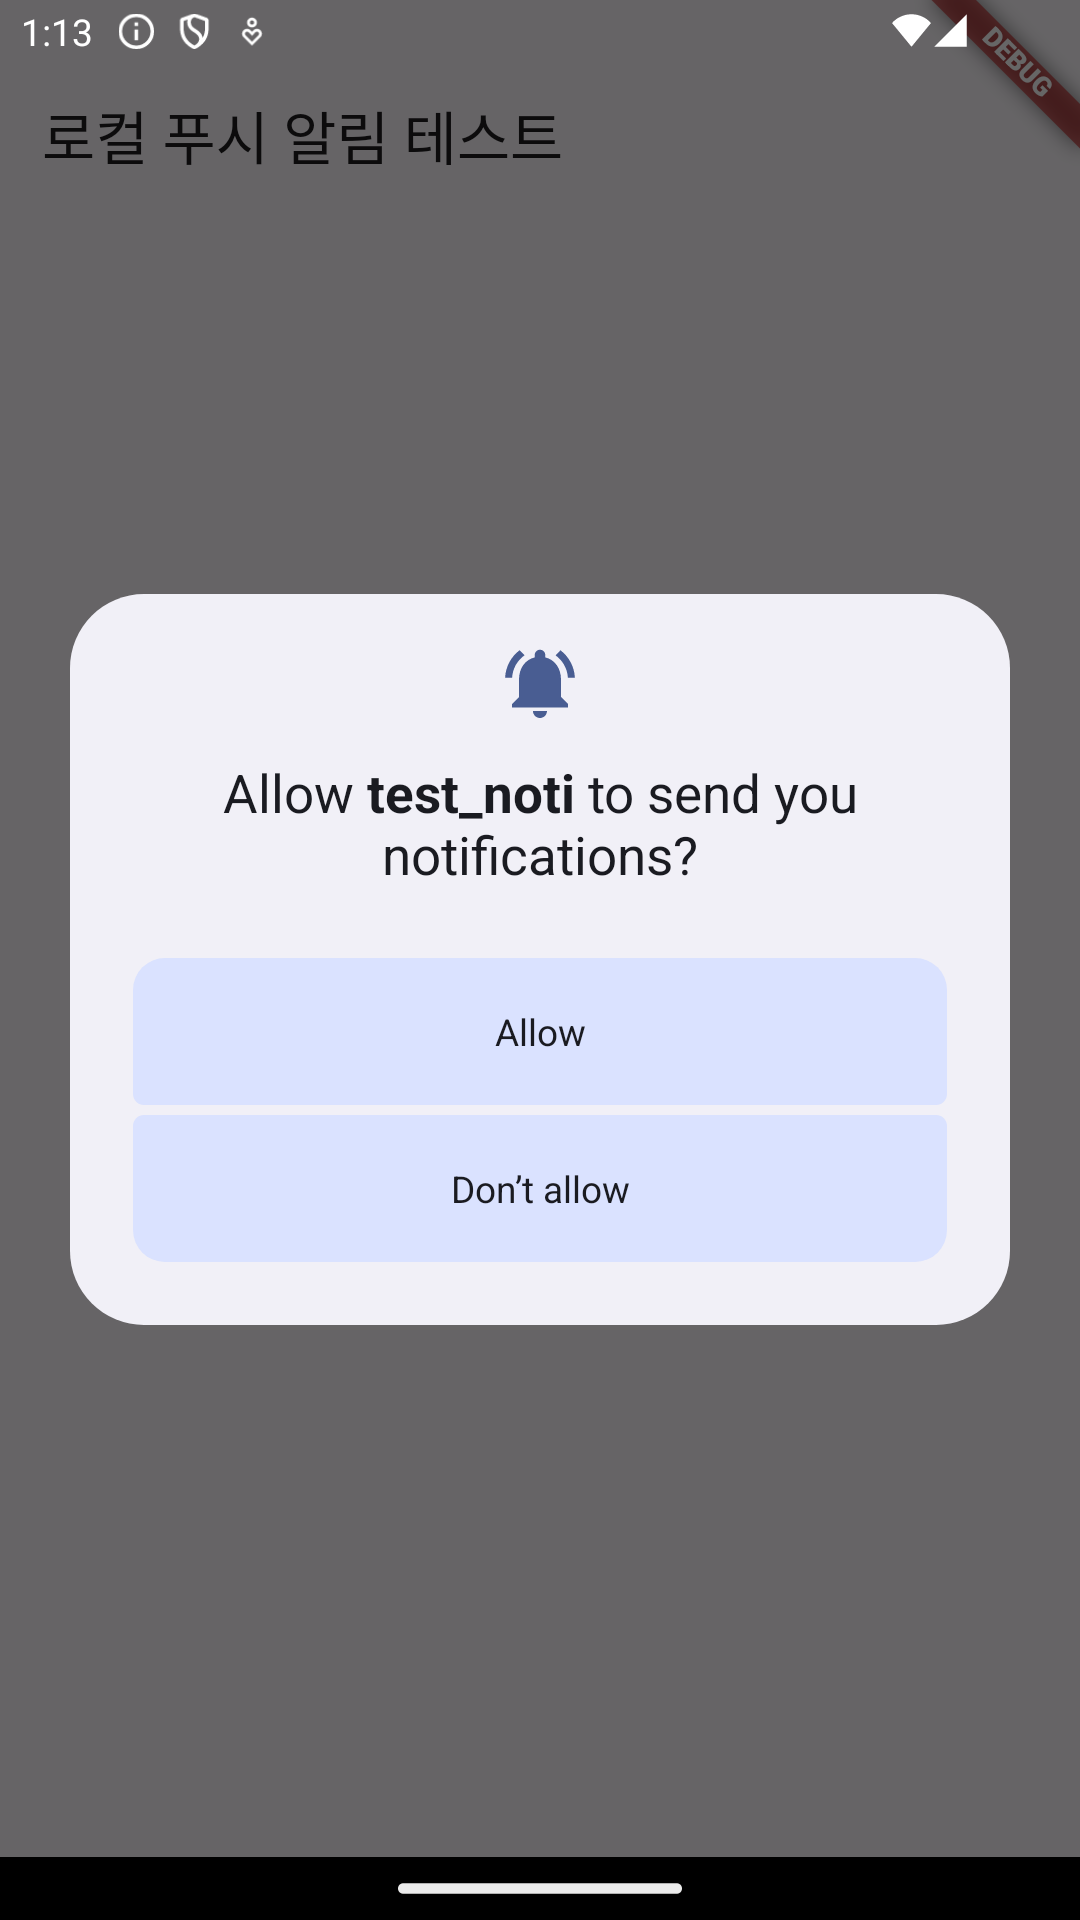
1) ios
앱을 빌드하고 실행하게 되면 처음에 아래 화면과 같이 알림 요청이 뜹니다.
일반 푸시 알림은 버튼을 클릭하자마자 푸시 알림이 바로 오게 됩니다.
스케줄 푸시 알림은 버튼을 누르고 나서 5초가 지나게 되면 푸시 알림이 오게 됩니다.

백그라운드 상태에서도 푸시 알림을 받는 것을 확인했고요.
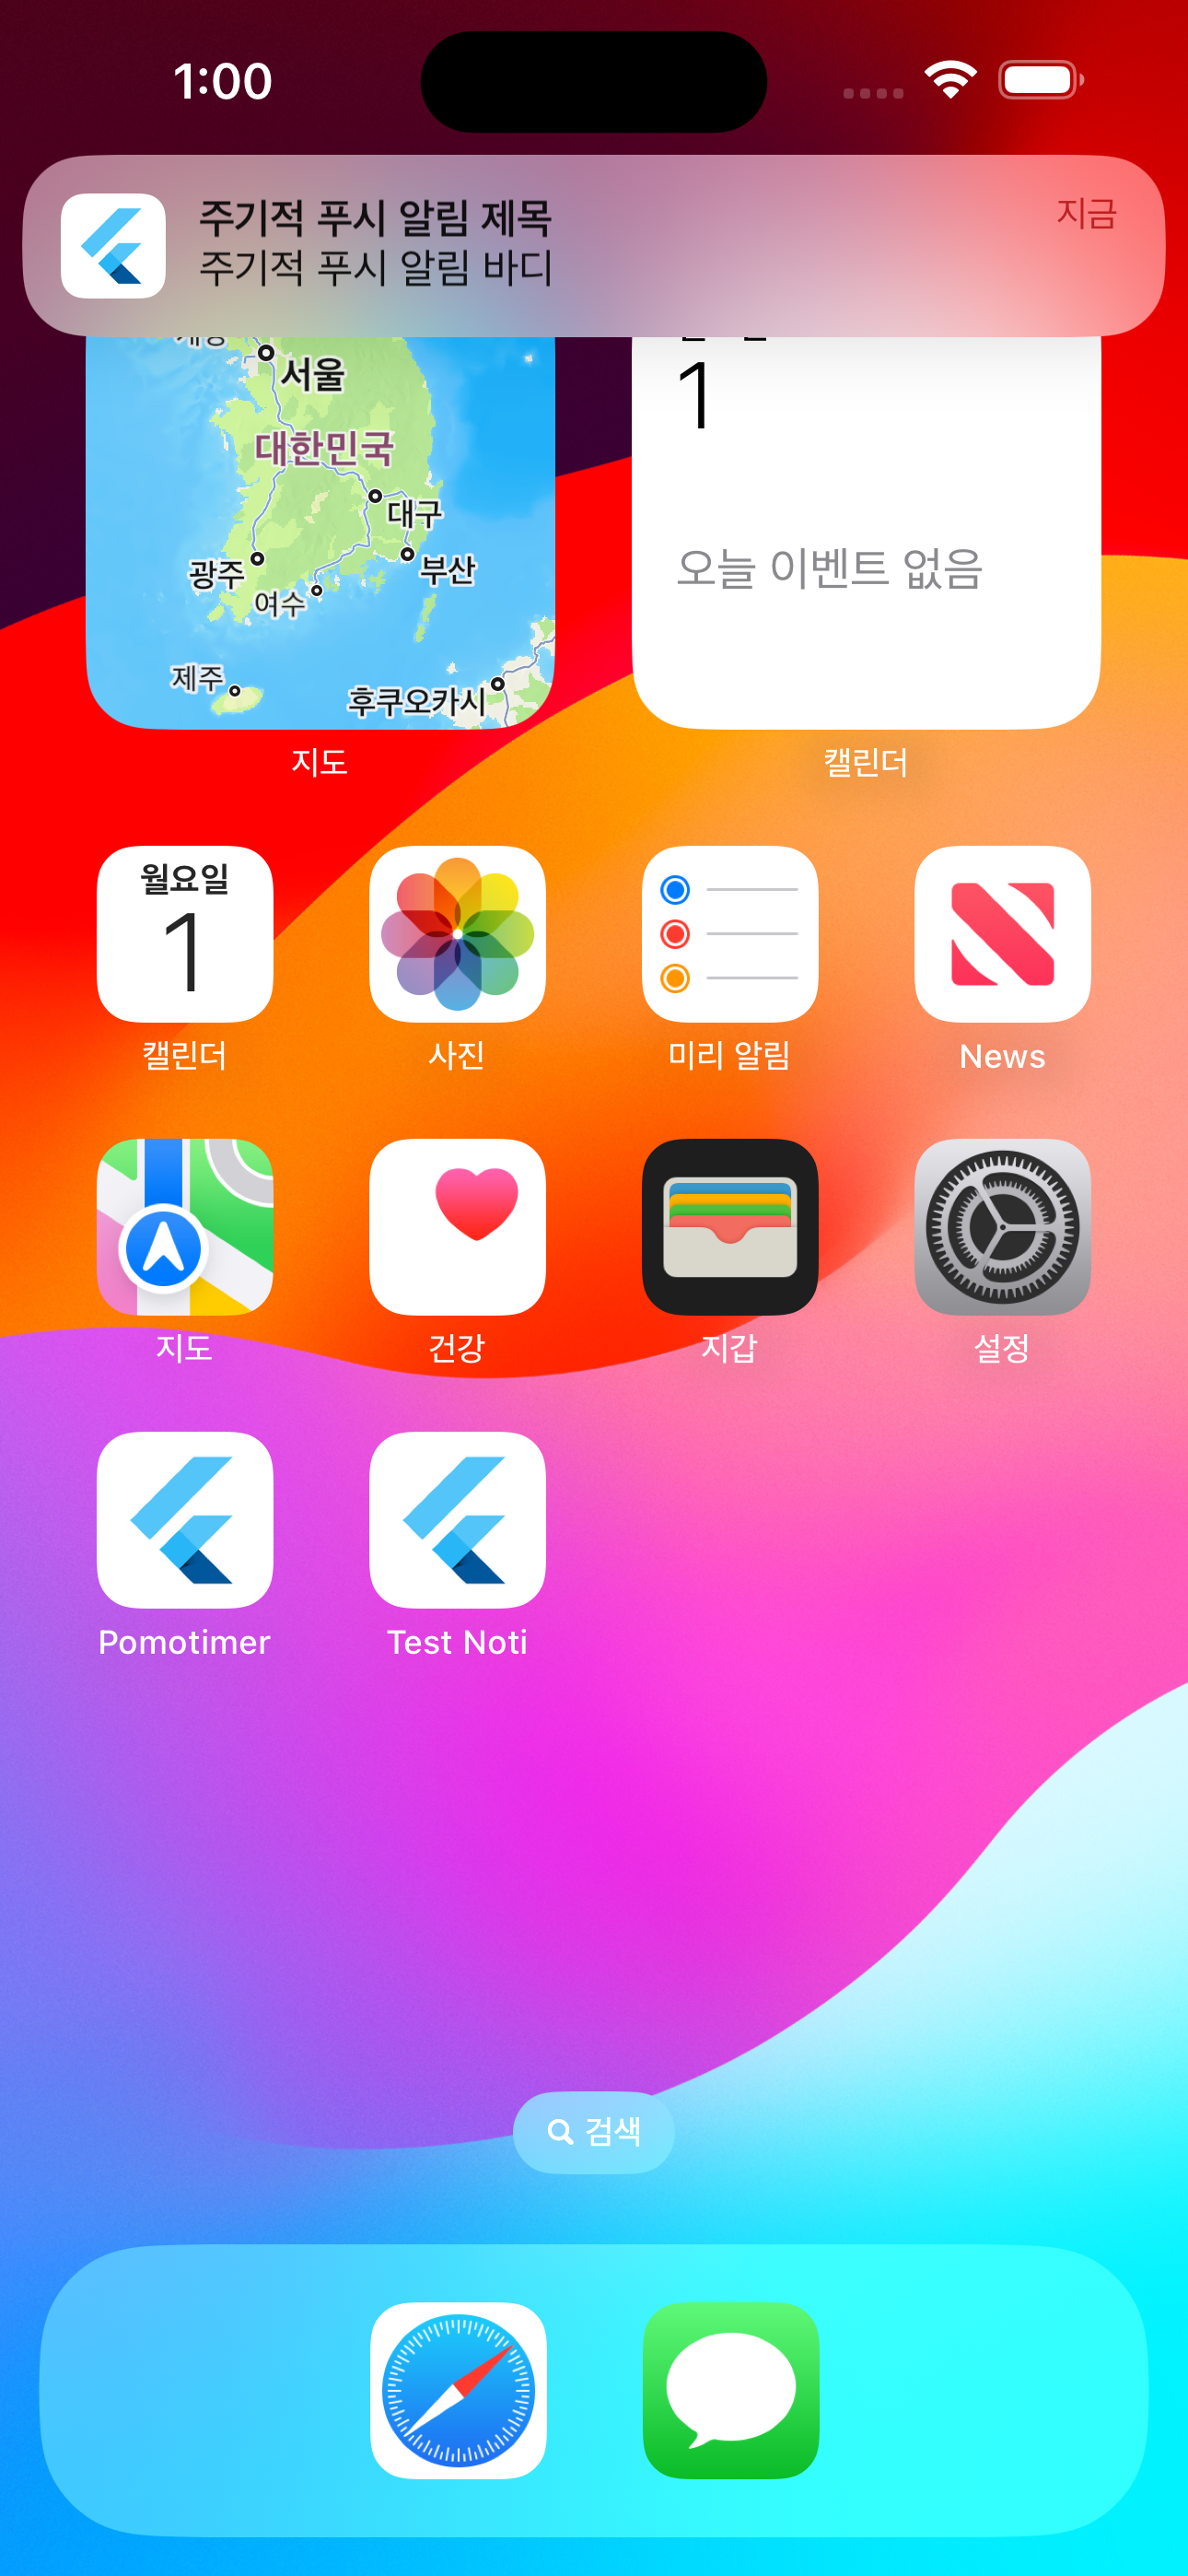
종류별 푸시 알림을 클릭할 때마다 메시지 페이지로 잘 이동되는 것도 확인했습니다.
또한 앱을 종료시켜도 주기 푸시 알림은 계속 옵니다. 그때 푸시 알림을 탭 하면 앱이 실행되면서 메시지 화면으로 이동하게 돼요. 😃
2) 안드로이드
안드로이드도 기능은 전부 동일합니다. 주요 화면들만 캡처했어요.
아래 알림 허용창을 다시 보고 싶다면 시뮬레이터에서 앱을 삭제하고 다시 실행하면 권한 요구 창이 또 뜹니다.

스케줄 푸시 알림은 버튼을 클릭하고 5초 안에 백그라운드로 앱을 내려야 해서 순발력(?)을 요하는 작업입니다. 🤣
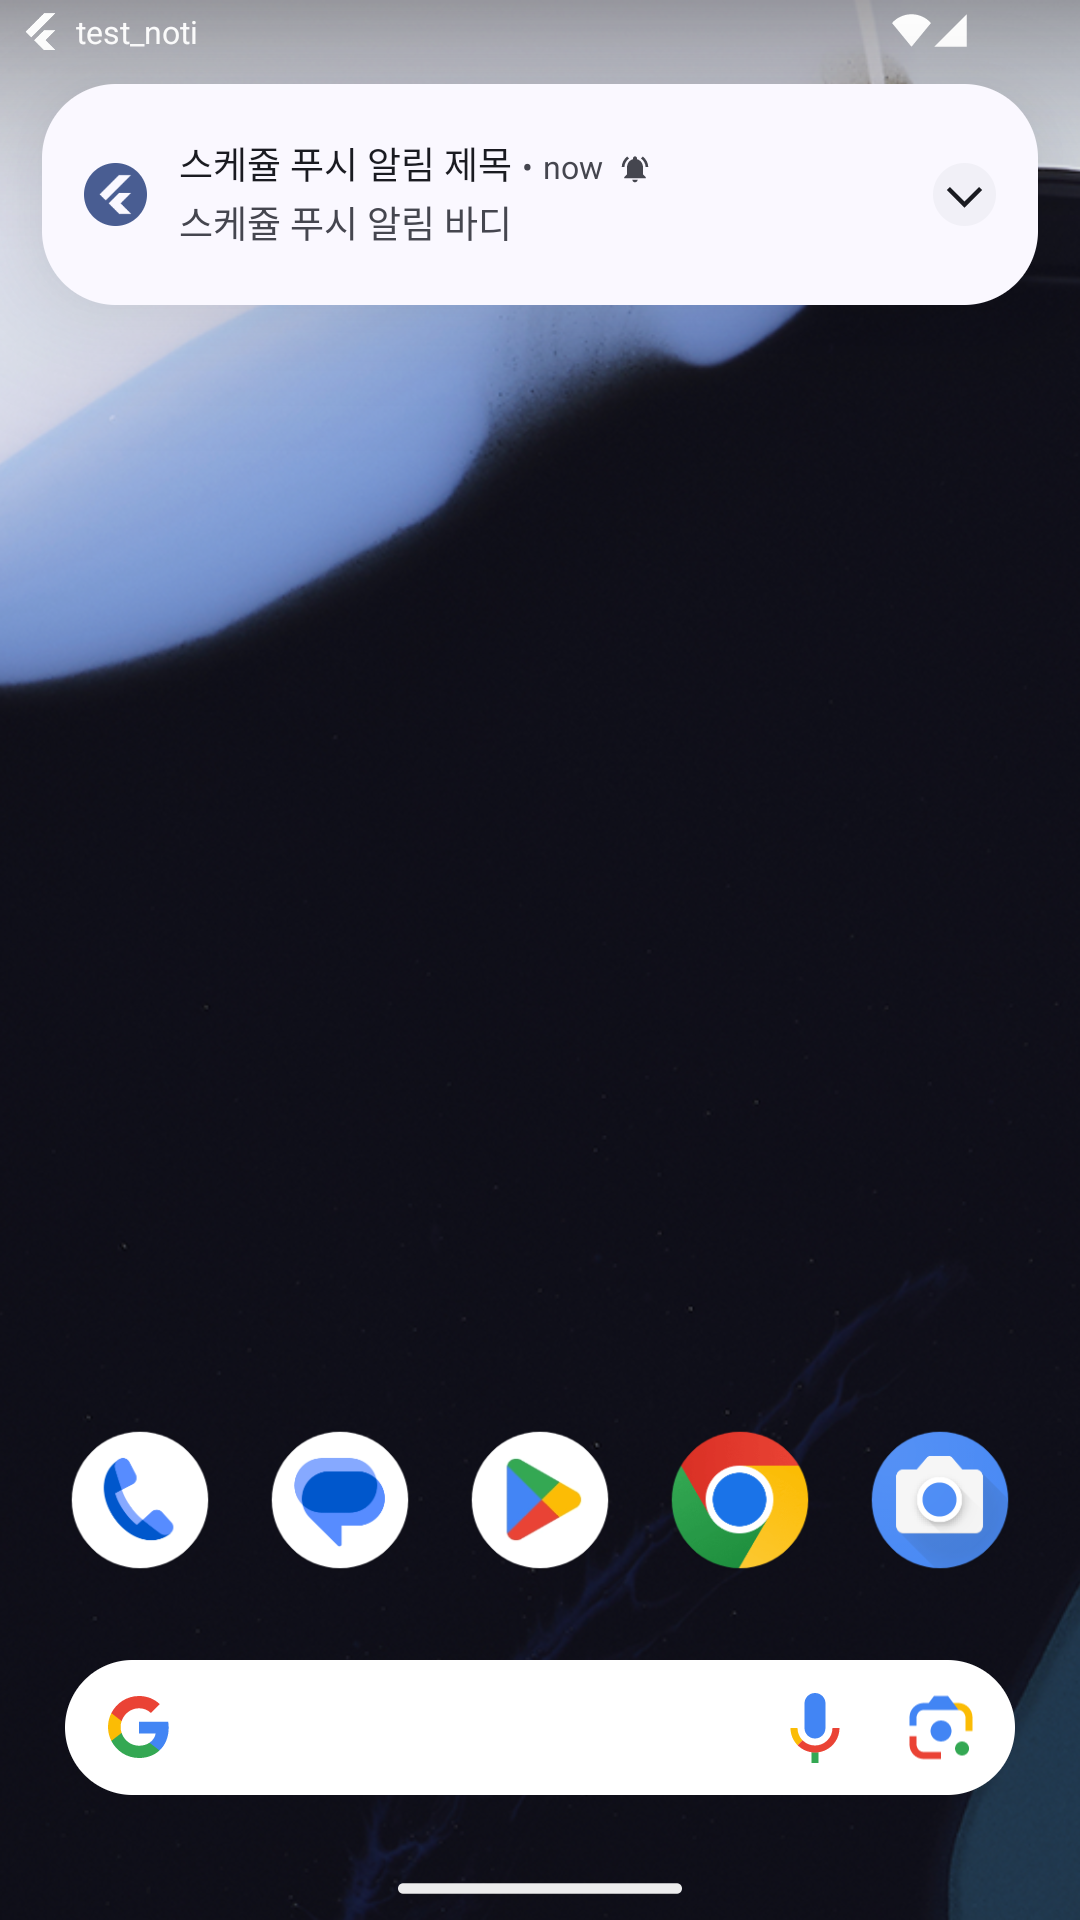
푸시 알림을 탭 하면 화면이 잘 이동됩니다.
여기까지 flutter_local_notifications 패키지 설치 방법에 대해 정리해 보았습니다.😉
'Programming > Dart & Flutter' 카테고리의 다른 글
| 플러터 앱에 구글 애드몹(admob) 광고 넣기 (4) | 2024.04.08 |
|---|---|
| 플러터 앱 이름, 아이콘 변경하기 (0) | 2024.04.04 |
| 플러터 앱에 Firebase Cloud Messaging(FCM) 푸시 알림 설정하기 - Android (13) | 2024.03.28 |
| 플러터 앱에 구글 폰트 설정하기 (0) | 2024.03.06 |